Run Adwords campaigns
Shopping campaigns offer a simple and flexible way to organize your Google Merchant Center product inventory within AdWords. To understand how google campaigns work please follow Setting up shopping campaigns.
Once your feed is submitted and approved, create an AdWords account and connect it to your Merchant Account under Settings > AdWords. Doing so, your products should become available for shopping campaigns.
If your products are approved in Merchant Center but they are not visible in AdWords campaigns, you may need to contact a Google representative to help.
The basic product campaign is to bid the same way for all your products, but you can improve your ads by bidding differently on groups of products.
Edit your campaign in AdWords, and go to Product Groups and click the "+" sign to find out how you can group them. Those groups can be defined using the following columns in the feed:
Category - is the google_product_category column in the feed and also the main way to organize your products into groups. It is filled with google taxonomies that should have been set as part of Set up Google Shopping
Brand - is your brand column in the feed, mapped by default to manufacturer attribute on your products.
Item Id - is your item_id column from the feed and should be mapped by default to your product ID from magento.
Condition - is the condition columns from the feed, by default all products having value "new". If you want to change that, create a new attribute on your products, set the accepted values on your products and map it under Columns Map.
Product type - is the product_type column in the feed, and should correspond to magento categories. That is if, product_type is mapped to Product Type by Category directive in the Columns Map.
Custom label 0-4 - should correspond to columns in the feed custom_label_0 to custom_label_4, and allow you to specify custom data on which you can group products. Those columns are not mapped by default in your feed, so you will need to add them.
If you want to group your products for use in a Shopping campaign, you'll need to setup custom labels in your feed.
Setting up custom labels
To use custom labels, you'll need the following:
Create new product attributes
To create new product attributes in Magento, one for each label. If you already have an attribute, you can use that. If it's not a drop-down, that's ok too, but please be aware of its limits, and make sure it has consistent values, otherwise your grouping won't work.
We suggest you make these attributes dropdowns, and add the values you intend to use. This will give you one place to manage their values: if you have a typo, instead of editing each product, you just edit the attribute. This will also help staying consistent with Google requirements (see below)
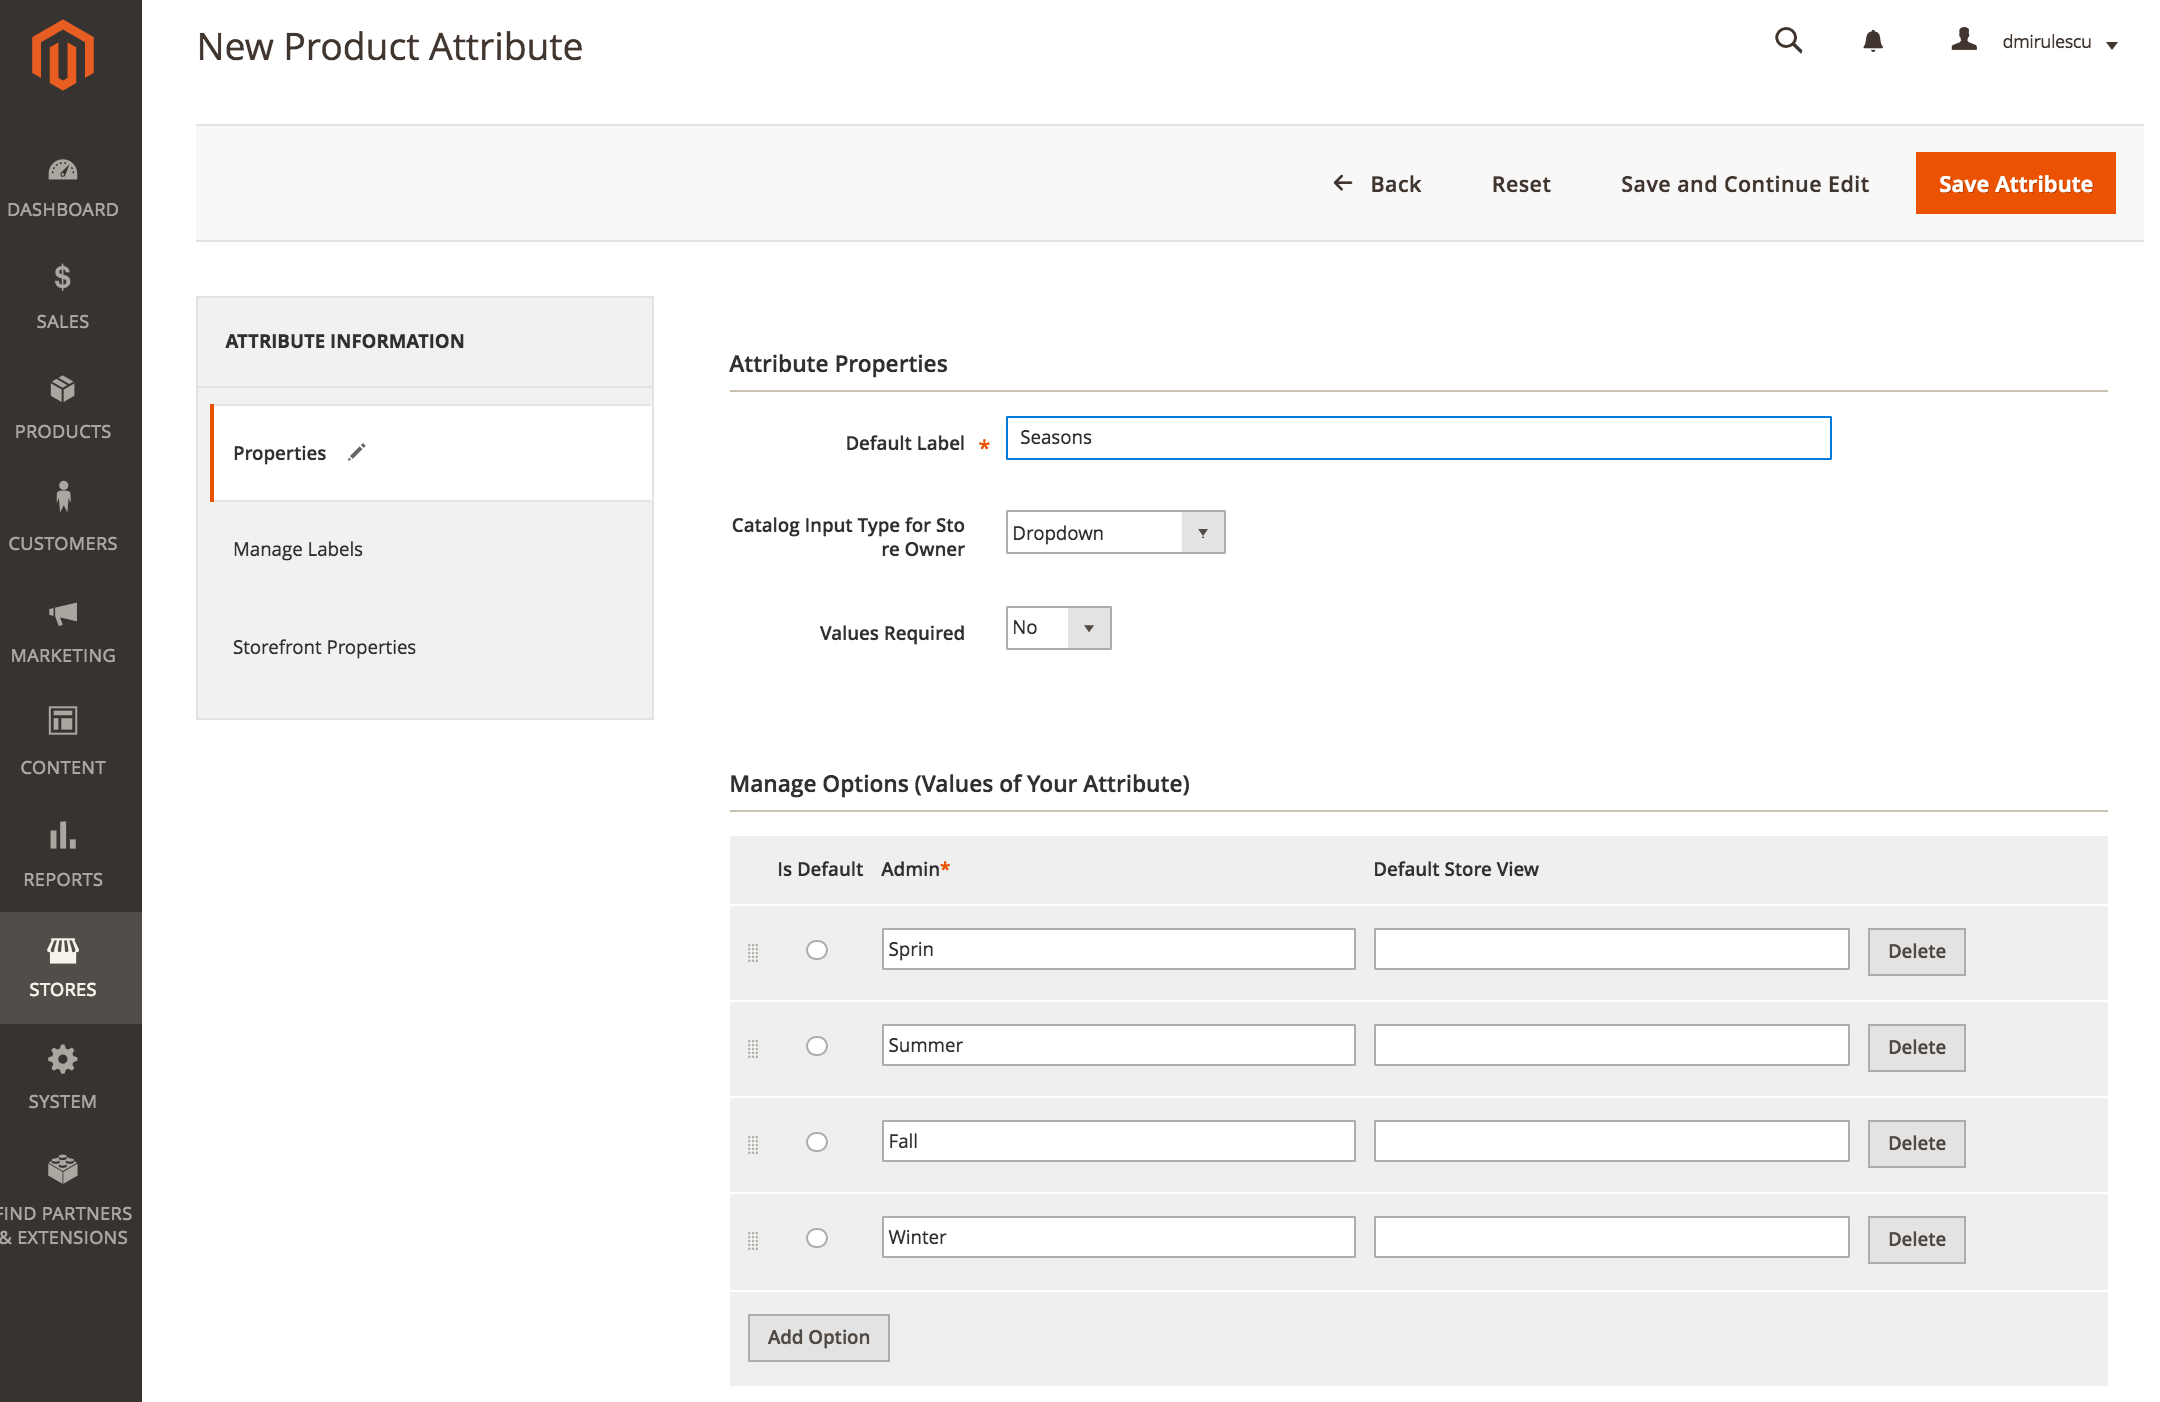
As an example, let's say you want to add a label named "season" to all your products:
a. Add a Magento attribute named Season, of type dropdown, and create all your label values to the attribute: Winter, Spring, Summer, Fall. (see Fig 4.1)
b. Add the Season attribute to all the relevant Attribute Sets. If you don't use Attribute Sets, you will still have to add it to the Default set.
Go to Catalog > Attributes > Manage Attribute Sets, pick your set from the list, then use Drag-and-drop to take Season from the right, and place it in one of the groups on the left. You'll have to do this for all relevant attribute sets. (see Fig 4.2)
After this is done, you can edit your products and fill in Season values.

Add Custom Labels to the feed columns
To include the new attributes in the feed as custom labels, you will need to do the following:
Go to the feed settings, under Columns Map and add a new column,
Name it custom_label_0, and select the new attribute ("season" in our example). You'll only need to do this once.
Save and you're done! The new feed that generates overnight should include the new attribute.
You can repeat these steps for up to 5 custom_labels. The attributes you set can have any value you'd like to use in AdWords.
Google requirements
You can create up to five custom labels, numbered 0 through 4, for each item in your feed. You may submit one value per item for each custom label attribute. You should assign a specific definition for each of the five custom labels and specify the possible values for each. Then, you use these custom labels consistently across the products in your Merchant Center account, assigning appropriate values to each product according to your definition. Each of the five custom labels can have only one value per product.
Source: https://support.google.com/merchants/answer/188494?hl=en
Limitations
You can only have 5 custom labels
one product can have only one value per label, so in total, a product can only have 5 labels
and you cannot group more than 1,000 products with the same labels.
As custom labels are meant to allow grouping of items, only 1,000 unique values are supported for each custom label attribute across the items in your account. Products with a custom label submitted after the limit was exceeded won’t be included in product groups using this custom label. To correct the issue, update your product data to reduce the number of unique values for the custom label to less than 1,000.
Source: https://support.google.com/merchants/answer/188494?hl=en
Setting up Price Buckets
Price buckets is a concept to help target campaign bids by product price ranges. I.e. products with price intervals:
< $50
$50 - $100
$100 - $500
> $500
To set them up, you would need to define a set of rules under Adwords Price Buckets feed setting and insert a new custom_label_0 column and map it to the Adwords Price Buckets directive in the feed Columns Map.
No comments to display
No comments to display